
FTP
2022-8-16 About 6 min
# FTP
FTP stands for the File Transfer Protocol. FTP was already designed in 1971 (knowing that IP was in development since 1974 and IPv4 was not protected until 1978), but was adapted around 1980 for use with TCP and IP. The purpose of FTP was very simple: to exchange files over the Internet, looking at the time it was mainly about academics publishing papers and wanting to read them. Today, FTP is still in use but its original purpose has been replaced by the (better) HTTP(S) protocol.
So why do we want to use FTP in 2022? The so-called "anonymous FTP" where anyone could download files from a server is almost extinct. But FTP is bidirectional and has user login capabilities. As a result, we still see FTP today in many places such as on a NAS (in addition to NFS and SMB) for storing files, or making backups. We especially still look at its use in werbhosting as well, it remains a popular method for uploading websites from your laptop to your server.
FTP has its roots in the 1970s.... Therefore, we note da it a hugely complex in today's standards. It has different transaction modes and file encoding transport modes. It opens and closes 1 port per transaction, which seemed like a good idea at the time to accept several connections at once. FTP doesn't have it with NAT, although thanks to modifications in NAT routers, that is largely solved now, as they track the connection and thus open necessary ports. SFTP and FTPS solve some of these problems.
# (S)FTP(S)?
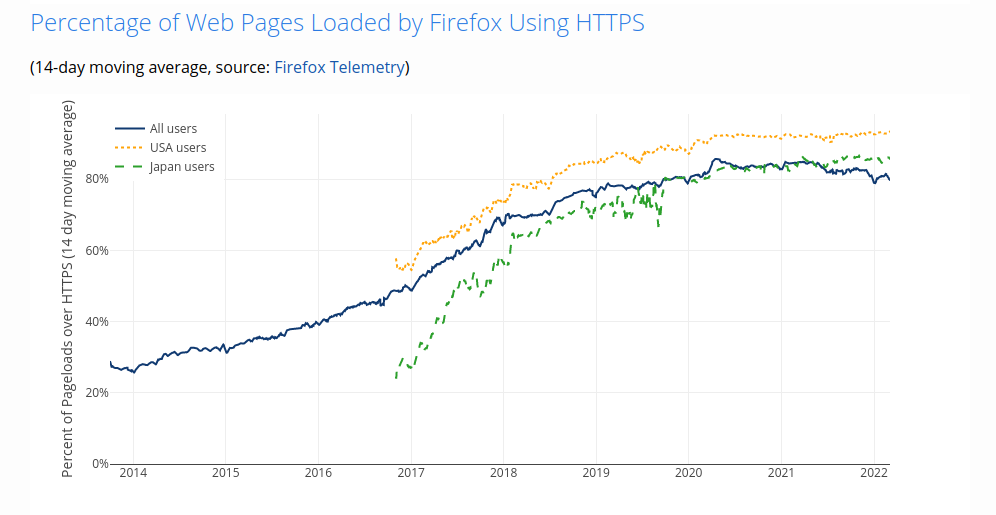
We are not going to set up an FTP server in this course, FTP itself is insecure. We are going to look at two protocols built on FTP: SFTP and FTPS. Why not FTP? The Internet is no longer the well-behaved place for academics/technologists that it has long been. We are in a world where every vulnerability is exploited within days. Not to mention the discoveries by Edward Snowden about NSA, and all the rest who want to massively eavesdrop on Internet traffic.... Since the NSA Internet documents were leaked we see a completely different Internet before us, previously encryption was only used for sending login data, after which it was turned off again. Many sites found it unnecessary. Since 2013 we saw a massive growth of unencrypted traffic on the Internet. The figures below are from Firefox (start measurement in late 2013):
While secure solutions and have been around longer it is only now having huge popularity. That's why in this course we are only going to see secure FTP
2 solutions were devised in the early 2000s to secure FTP:
The first is to use SSH, and over an SSH connection send FTP traffic in a slightly modified form. This was called SFTP.
The second solution devised was to use SSL (Secure Socket Layer) to secure the connection. SSL is a layer on top of TCP that provides encryption just like HTTPS. SSL was later called TLS (Transport Layer Security). This solution was named FTPS.
# End User
How do we use FTP on our laptop? There are a number of possible programs:
- FileZilla (opens new window) - a great, free and open source FTP client for Windows, Mac and Linux.
- WinSCP](https://winscp.net/) - a free FTP client for Windows.
- Cyberduck](http://cyberduck.io/) - a free FTP client for Mac and Windows with support for many other protocols.
# FTPS with VSFTPD
vsftpd: the Very Secure FTP Daemon is an FTP server for Unix systemem. It is the default FTP server in the Ubuntu, CentOS, Fedora and RHEL Linux distributions. It is licensed under the GNU General Public License. It supports IPv6, TLS and FTPS! We are going to use VSFTPD to create an FTPS server.
# Installation
We can install vsftp via APT:
sudo apt update
sudo apt install vsftpd
1
2
2
We check the status with systemctl:
sudo systemctl status vsftpd
1
# Configuration
Before we start configuring FTP we are going to set up some firewall rules to allow FTPS traffic
sudo ufw allow 20/tcp
sudo ufw allow 21/tcp
sudo ufw allow 990/tcp
sudo ufw allow 40000:50000/tcp
1
2
3
4
2
3
4
Now we are ready to adjust a the configuration:
sudo nano /etc/vsftpd.conf
1
We remove the following lines:
# This option specifies the location of the RSA certificate to use for SSL
# encrypted connections.
rsa_cert_file=/etc/ssl/certs/ssl-cert-snakeoil.pem
rsa_private_key_file=/etc/ssl/private/ssl-cert-snakeoil.key
ssl_enable=NO
1
2
3
4
5
2
3
4
5
Then add the following lines add:
anonymous_enable=no
local_enable=yes
write_enable=yes
chroot_local_user=yes
user_sub_token=$USER
local_root=/home/$USER/ftp
pasv_min_port=40000
pasv_max_port=50000
userlist_enable=yes
userlist_file=/etc/vsftpd.userlist
userlist_deny=no
rsa_cert_file=/etc/ssl/private/vsftpd.pem
rsa_private_key_file=/etc/ssl/private/vsftpd.pem
ssl_enable=yes
allow_anon_ssl=no
force_local_data_ssl=yes
force_local_logins_ssl=yes
ssl_tlsv1=yes
ssl_sslv2=no
ssl_sslv3=no
require_ssl_reuse=no
ssl_ciphers=HIGH
1
2
3
4
5
6
7
8
9
10
11
12
13
14
15
16
17
18
19
20
21
22
2
3
4
5
6
7
8
9
10
11
12
13
14
15
16
17
18
19
20
21
22
What does this configuration do?
anonymous_enable=no: ensures that anonymous users cannot log in.local_enable=yes: ensures that local users can log in.write_enable=yes: ensures that we can write data.chroot_local_user=yes: ensures that we use the correct home directory.user_sub_token=$USER: provides the correct username, we can use it to give usernames a prefix or suffix.local_root=/home/$USER/ftp: defines which directory allows FTP.pasv_min_port=40000andpasv_max_port=50000: specifies the minimum port range for FTP transport ports to open.userlist_enable=yes: allows us to use a userlist, only users who are in the userlist can log in.userlist_file=/etc/vsftpd.userlist: is where the userlist is stored.userlist_deny=no: makes sure we are in "allow" mode, only users on the list can log inrsa_cert_file=/etc/ssl/private/vsftpd.pem: specifies the location of the TLS certificatersa_private_key_file=/etc/ssl/private/vsftpd.pem: specifies the location of the TLS private keyssl_enable=yes: ensures we can use SSL/TLSallow_anon_ssl=no: ensures that anonymous users cannot log in over SSL/TLSforce_local_data_ssl=yes: ensures that we must send data over SSL/TLSforce_local_logins_ssl=yes: ensures we must log in users over SSL/TLSssl_tlsv1=yes: allows us to use TLS v1ssl_sslv2=no: ensures we can not use SSL v2, these versions are insecuressl_sslv3=no: ensures we can not use SSL v3, these versions are insecurerequire_ssl_reuse=no: ensures that we can use SSL/TLS if the connection no longer existsssl_ciphers=HIGH: ensures that we must use the highest/secure TLS ciphers
Now we are going to create a TLS certificate for vsftpd:
sudo openssl req -x509 -nodes -days 365 -newkey rsa:2048 -keyout /etc/ssl/private/vsftpd.pem -out /etc/ssl/private/vsftpd.pem
1
We fill in the following fields, the information about the "subject" of the certificate is for your information, the penultimate question about Common Name is important because this must be our IP!
Generating an RSA private key
..............................................................................................................+++++
....................................................................................+++++
writing new private key to '/etc/ssl/private/vsftpd.pem'
-----
You are about to be asked to enter information that will be incorporated
into your certificate request.
What you are about to enter is what is called a Distinguished Name or a DN.
There are quite a few fields but you can leave some blank
For some fields there will be a default value,
If you enter '.', the field will be left blank.
-----
Country Name (2 letter code) [AU]:BE
State or Province Name (full name) [Some-State]:Antwerp
Locality Name (eg, city) []:Lier
Organization Name (eg, company) [Internet Widgits Pty Ltd]:Leenux Corp.
Organizational Unit Name (eg, section) []:Unit Technology
Common Name (e.g. server FQDN or YOUR name) []:10.2.0.1
Email Address []:
1
2
3
4
5
6
7
8
9
10
11
12
13
14
15
16
17
18
19
2
3
4
5
6
7
8
9
10
11
12
13
14
15
16
17
18
19
We now restart vsftpd:
sudo systemctl restart vsftpd
1
# Creating users
vsftpd uses our Linux users, we are going to create a user for our web designer Rick:
sudo adduser rick
1
We will fill in the following fields:
$ sudo adduser rick
Adding user `rick' ...
Adding new group `rick' (1001) ...
Adding new user `rick' (1001) with group `rick' ...
Creating home directory `/home/rick' ...
Copying files from `/etc/skel' ...
New password:
Retype new password:
passwd: password updated successfully
Changing the user information for rick
Enter the new value, or press ENTER for the default
	Full Name []: Rick A.
	Room Number []:
	Work Phone []:
	Home Phone []:
	Other []:
Is the information correct? [Y/n] y
1
2
3
4
5
6
7
8
9
10
11
12
13
14
15
16
17
2
3
4
5
6
7
8
9
10
11
12
13
14
15
16
17
We also create an FTP directory for Rick right away:
sudo mkdir -p /home/rick/ftp/files
sudo chown nobody:nogroup /home/rick/ftp
sudo chown rick:rick /home/rick/ftp/files
1
2
3
2
3
vsftpd itself runs under user nobody, the FTP directory itself must be owned by it or our connection will fail.
We also quickly add a test file:
echo "dQw4w9WgXcQ" | sudo tee /home/rick/ftp/files/test.txt
1
We also need to give Rick access to FTPS:
echo "rick" | sudo tee -a /etc/vsftpd.userlist
1
With this we add `rick`` to the end of the userlist, we can also just do this with nano but it may be a little clever for once!
# Testing connection
We test with ftp if we can connect properly:
ftp localhost
1
$ ftp localhost
Connected to localhost.
220 (vsFTPd 3.0.3)
Name (localhost:ubuntu): rick
530 Non-anonymous sessions must use encryption.
Login failed.
421 Service not available, remote server has closed connection
1
2
3
4
5
6
7
2
3
4
5
6
7
The ftp command does not support FTPS, so our setup succeeded!
We better test this with FileZilla or WinSCP.
We connect with the following credentials:
- Protocol: FTPS
- Host:
<server IP> - Username: rick
- Password:
<your password> - Port: (default value)
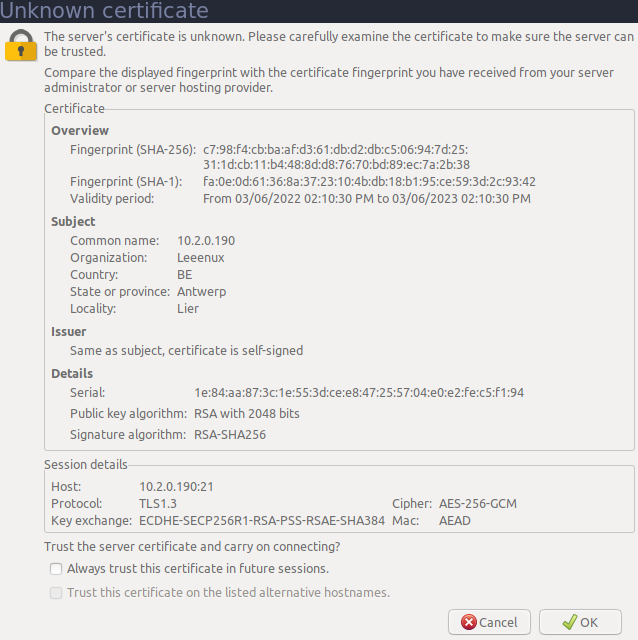
You normally also get a warning whether you trust the certificate, we answer yes. Our TLS certificate is signed by ourselves, in practice we would request it from a certificate authority.
filezilla](./filezilla.png)
We can now upload and download files via FTPS, try this out!
# SFTP with OpenSSH
We can also start using SFTP, this protocol works over SSH itself. We are going to configure access for SFTP in our sshd_config:
sudo nano /etc/ssh/sshd_config
1
We'll add the same thing at the bottom:
Match group sftp
X11Forwarding no
AllowTcpForwarding no
ForceCommand internal-sftp
PasswordAuthentication yes
1
2
3
4
5
2
3
4
5
Now what does this do?
Match group sftp: ensures that all configuration below only applies to users in the groupsftp.X11Forwarding noandAllowTcpForwarding no: ensures that we cannot use X11 or TCP forwarding, the user can only use SFTP.ForceCommand internal-sftp: ensures that the users can only useinternal-sftp, the user will not get shell access.PasswordAuthentication yes: ensures that users in the sftp group can log in with a password.
We now restart the SSH server:
sudo systemctl restart sshd
1
We create the group sftp:
sudo addgroup sftp
1
And now add rick to the group:
sudo usermod -a -G sftp rick
1
# Test connection
We can now log in via SFTP with the following credentials:
- Protocol: SFTP
- Host:
<server IP> - Username: rick
- Password:
<your password> - Port: 22